Elementor is a drag-and-drop WordPress page builder that creates stunning web page layouts with minimal coding.
Alongside WPBakery, Elementor is one of the most popular no-code plugins for WordPress. It’s used by millions of website owners worldwide, and comes pre-installed with a wide variety of modern WordPress themes.
The Elementor plugin can also be used with your existing WP theme, and will provide a whole range of modules to enhance your website beyond the standard Gutenberg editor.
But despite the fantastic benefits that Elementor provides, it can also bloat the code behind your website.
In this article, we are going to take a look at addressing the page speed issues that Elementor contributed to in a real-life example. Step-by-step, we’re going to turn a low speed score into a super-fast site that your users and Google will love.
Table of contents
Why does website page speed matter?
Conversion rates
Your website speed can have a major impact on whether visitors stay on your website or click the back button. Speedy websites not only keep more of your visitors engaged for longer, but they are also more likely to take action.
CloudFlare provide some good examples of why speed matters:
- Mobify found that speeding up their homepage by just 100 milliseconds resulted in a 1.11% increase in conversions.
- The BBC noticed that they lost about 10% of total visitors for every extra second it took for a page to load.
- Retail giant Walmart found that improving their page load time by just one second led to a 2% increase in conversions.
User experience
Tying in nicely with conversion rates is the user experience. Slow-loading website pages that behave sluggishly can irritate your users. Waiting for images or modules to display properly can drive people crazy and makes them more likely to ditch their session on your website.
Bounce rates
Bounce rate is the percentage of people who come to your website and then quickly bail after only looking at one page. That often happens when your content is poor, but equally so when the page doesn’t load up fast enough.
Improved Google rankings
When it comes to getting the thumbs up from Google and achieving a good ranking, a fast website is a must. Google loves to send users to sites where they can get the information they need in a flash. They’re especially interested in how your website performs on mobile devices when deciding where to rank you, so scoring well here is a must.
Fixing a slow Elementor site
We are going to be using one of our own client’s websites for this case study. By using a real site instead of just the base theme and minimal plugins, you can get a better idea of what’s possible for your own site.

Here’s what we are working with:
- GRD theme by Steel Themes, available from Theme Forest
- Child theme installed for customisation
- 27 active plugins including WooCommerce and Slider Revolution (which can be extra challenging)
- WordPress version 6.3.2
- Running on an Ionos dedicated cloud server with Plesk (more on this later)
- PHP version 8.2
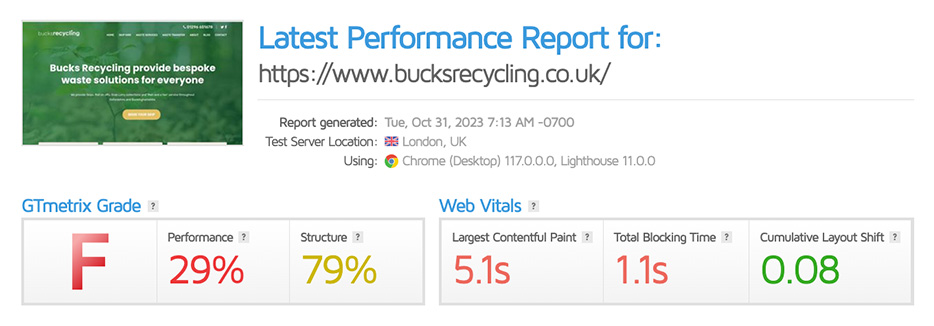
Here’s the benchmark speed test data before we get started on the Elementor speed optimisation. Firstly with GTmetrix:

The “F” score is pretty awful, so there’s plenty of room for improvement. We are going to be aiming for an “A” here.
Now for the Google Page Speed benchmark:

The site scores well for certain criteria here, but it’s the Performance scores which are lagging behind.
So let’s get started.
Elementor image optimisation
The first thing we are going to do is optimise the site’s images.
What is website image optimisation?
Optimising website images is the process of delivering high-quality images in the right format, dimension, size, and resolution while keeping them to the smallest possible size.
On average, nearly two thirds of a website’s weight is comprised of images. So if we are able to reduce the size of these images without reducing the quality, then it will have a direct and positive impact on page load speeds.
Image optimisation can be achieved by resizing the image, caching, or by compressing. And in this context, it can take two forms: “lossy” or “lossless”.
Lossless compression achieves an overall reduction in file size without any compromise in image quality. This is particularly useful for photographers or sites relying on very sharp imagery.
With lossy compression, there might be a marginal loss in quality but it’s usually undetectable by your site’s visitors.

The best image optimiser for Elementor
To compress and optimise the site images, we are going to install Imagify.
Imagify is our preferred image optimiser because:
- It does a great job
Compared to image optimisers like Smush and EWWW, it’s in a completely different league of performance. - Images are converted to WebP
Even the free version of Imagify will convert images to the modern WebP format that provides better lossless and lossy image compression. This is only available in the paid plan with some image optimisation plugins. - It’s simple to use
There are a good balance of settings. Imagify offers compression flexibility without being overly complex to install and setup.
After installing Imagify, I went to the Settings and specified that images are displayed in WebP format. Without this step, Google Page Speed will most likely flag it as a mobile issue. Choose the <picture> tags option, and the CDN reference will appear after our next optimisation step (as seen below).
While adjusting these settings, check the box to auto-optimise images on upload. It’s good to ensure that images continue to be optimised as they are added to a site going forward.

Next, select if you want any custom folders optimised by the plugin. I would suggest you do so to take care of any images within your parent theme.
With the Imagify general settings in place, click Save & Go To Bulk Optimizer.
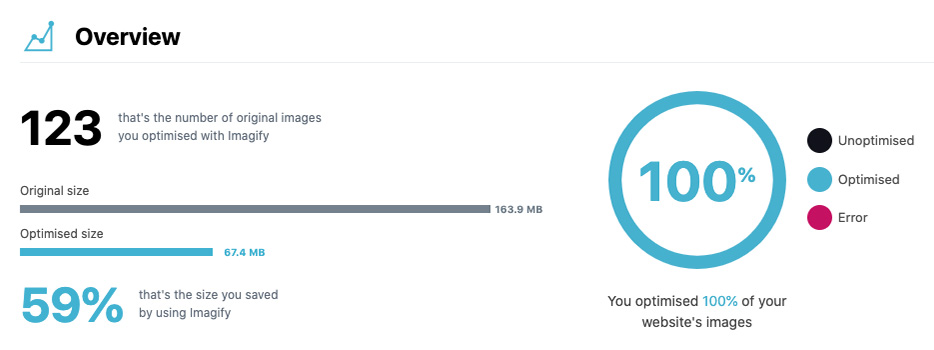
Then simply select your folders, and Imagify ‘Em All. This process will take some time, but as you can see below, the results are well worth it:

Even though we manually optimised a lot of these images during the initial site development, Imagify still compressed the image sizes by a whopping 59%.
To illustrate how Imagify outperforms the more popular image optimising plugin Smush, take a look at the figures below after using the Bulk Smush feature.

On completion of the Bulk Smush script, those same 1662 images had been optimised but the reduction was only a total of 4.2MB, or 6.4%. That’s a poor effort.
Elementor CDN
Next, we are going to set up a Content Delivery Network.
What is a CDN?
A CDN (or Content Delivery Network) optimises the delivery of website content to users regardless of their geographical location. Your site probably includes files that range from images to scripts. The CDN will strategically disperse these across a global network of servers. Then acting as a traffic manager, the CDN directs users to the nearest server, reducing the lag between a user’s page request and it actually loading.
Using a CDN also goes beyond just content delivery.
If your website has a surge in traffic without the assistance of a CDN, it’s going to be digital gridlock. But with a CDN in place, the load is intelligently distributed across servers, averting the risk of a website crash during the busiest of times.
Furthermore, CDNs enhance security by providing an additional layer between the origin server and potential threats such as DDoS attacks and other malicious activities.
The best CDN for Elementor
Our preferred choice of CDN is always Bunny.net.
It’s a very cost effective option when compared to other Content Delivery Networks. Bunny also offers the flexibility to choose which continents you want to serve content from. Conveniently, WP Rocket have a deal with Bunny.net, making it the perfect pairing for your speed optimisation efforts.
Alternatively, get in touch with us and ask to use our CDN subscription for a few dollars a month.

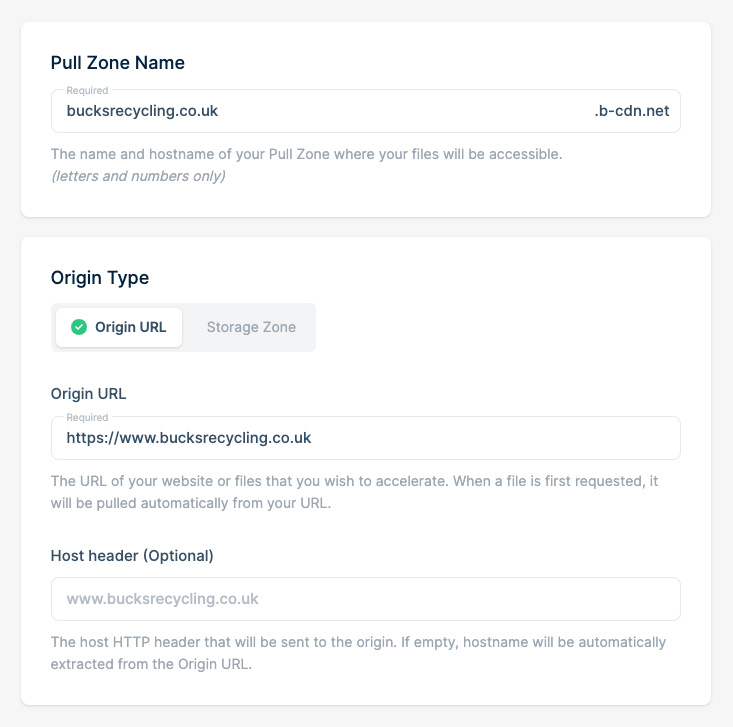
Once you’ve signed up for an account, head to the Dashboard to create your first “Pull zone” as seen above. This will be used to pull your files from the origin site for distribution by the Bunny.net servers of your choosing.
Elementor caching plugin
With the image sizes reduced and the CDN created, we are going to install a plugin for caching on the site.
What is website caching?
When a website is accessed by a visitor, the conventional process involves the server fetching the pages and posts, and pulling in the widgets and functions for each browsing session.
Over time, these loading processes remain identical.
With caching activated, we can take advantage of this repetition, and prompt the server to recollect the final result instead of undertaking each request again.
The first time a visitor accesses your website, it loads in the standard format where the server request is transformed into the web page displayed on their browser. But this data is then archived. Whenever another browsing session occurs, the server just provides the pre-prepared HTML file to the browser, saving a load of time.
The best caching plugin for Elementor
There are lots of free caching plugins available and some of the most popular include W3 Total Cache, WP Super Cache and LiteSpeed Cache. Each of these options have millions of installations and do a great job.
However for this performance upgrade, we are going to be using WP Rocket for a few reasons:
- It’s the absolute best caching plugin for WordPress
Although it comes at a price, it’s worth it for the amount of time it will shave off your site’s loading speed. Remember – every 100 milliseconds can equal more than a 1% conversion increase. - WP Rocket works fantastically with Slider Revolution
This can often be a big factor if a page is running slowly. - There are fewer options than other popular caching plugins
Why is this a good thing? Because experimenting with all of the possible combination of settings can drive you crazy. With WP Rocket, you don’t have to worry about this. Install it, adjust a few options and the plugin will make your site run extra fast.
So with the plugin installed, there are just three sections we want to focus on. Check the following boxes for each section:
WP Rocket file optimisation settings

- Minify CSS files
- Optimize CSS delivery
Use “Remove unused CSS”. If this breaks the site, opt for “Load CSS asyncronously” - Minify JavaScript files
- Load JavaScript deferred
Insert the following into the exclusion field if you’re using Slider Revolution:
/jquery-?0-9.(.min|.slim|.slim.min)?.js
/jquery-migrate(.min)?.js - Delay JavaScript execution
Check the boxes for “WP Bakery” and “Slider Revolution” if it’s in use. We don’t want to delay the loading of elements needed immediately. Then insert the following into the exclusion field if you’re using Slider Revolution:
\/jquery(-migrate)?-?([0-9.]+)?(.min|.slim|.slim.min)?.js(\?(.*))?( |’|”|>)/revslider/public/assets/js/setREVStartSize
rev_slider_
revslider_
window.RS_MODULES
WP Rocket media settings

- Enable for images
- Enable for CSS background images
- Enable for iframes and videos
- Add missing image dimensions
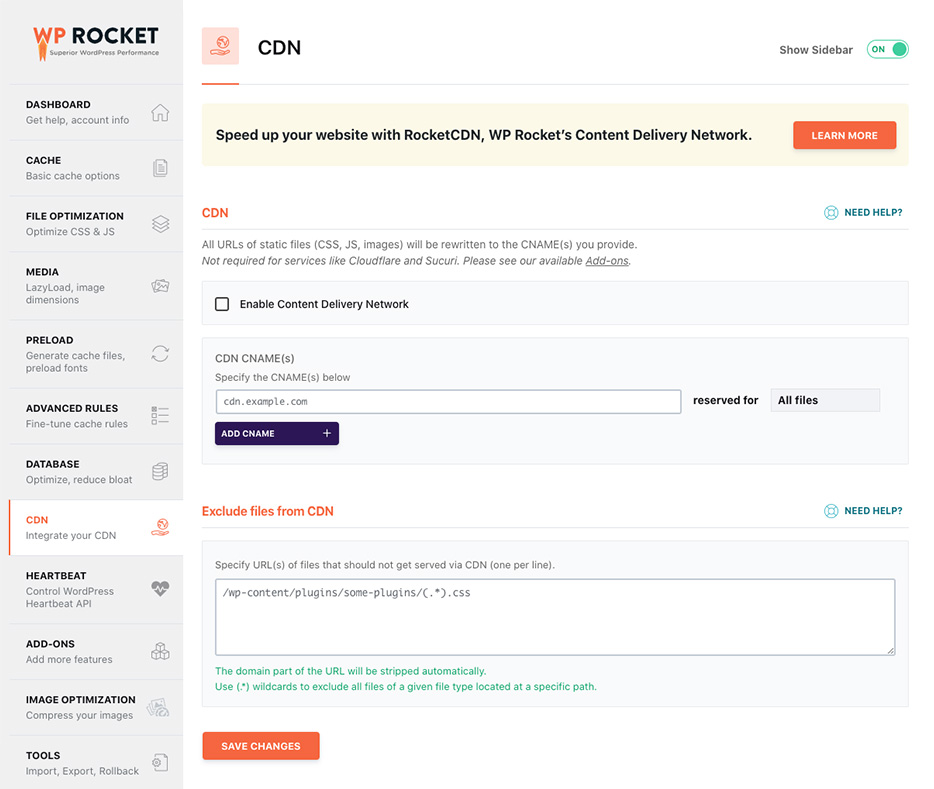
WP Rocket CDN settings

- Enable Content Delivery Network
Insert the file path previously created during the CDN setup
WP Rocket speed tests
With the caching plugin set up, let’s run a speed test to check the results…
Firstly, GTmetrix again:

A grade “A” is fantastic. We’ve also boosted the Performance (29% > 98%) and Structure (79% > 92%) scores of our slow Elementor site to new levels.
Now for the Google Page Speed test again:

It’s looking much better. The Mobile performance has made some good strides forward (29 > 61), and the Desktop score (73 > 93) has turned green. Very satisfying.
Google Page Speed can be tougher to crack, and there’s still room for further improvement. So let’s optimise things further by looking at the plugins.
Elementor plugin optimisation
An easy way to increase your website speed is to remove any unnecessary or unused plugins. This reduces the amount of code in your files, and therefore the loading time.
All of the plugins that remain will form the code used across the whole site. These elements include CSS and JavaScript file references and inline code, contributing to the page size.
In some cases, this site-wide code is essential. But in most situations a plugin is just intended for use on a specific page or page type.
Take Slider Revolution for example. This plugin tends to be used on your homepage to create an initial wow-factor. But that’s it. You’re unlikely to need a slider with this level of functionality elsewhere on your site. But the code is still there in the background, even on the most basic of pages.
So let’s start removing some of the coding clutter that’s built up from the various plugins.
To do so, we are using Asset CleanUp Pro.
Asset CleanUp Pro stops unnecessary functions from loading on your website. It consolidates the remaining assets into fewer files, significantly reducing the number of .css and .js files loaded by the browser. When coupled with a caching system such as WP Rocket, it amplifies the speed enhancement even further.
After installing the plugin, the easiest way to strip away functions is to head to the Plugins Manager.
Here’s the first plugin in our list:

Contact Form 7 is only used on the main contact page in this case study. So we can safely unload it from all pages, then make an exception to display it on /contact-us.
It’s then a case of going through all other plugins in the list and setting them for use on individual pages or post types.
I would also reccommend going to the Site-Wide Common Unloads and HTML Cleanup sections. Here you can toggle standard WordPress head functions and tags that aren’t necessary for your site. This can help to fine tune your optimisation and shave off as much loading time as possible.
In our case, there are lots of unnecessary elements, so I’m toggling them all to “off”.

Finally, you might want to investigate the CSS and JS Manager. But be warned – only venture into this section of Asset CleanUp Pro if you’re experienced with WordPress plugins and scripts.
This section allows you to turn off files for individual plugins and defer loading, which helps to make them as light as possible. If you do decide to use the CSS and JS Manager, be sure to test the function in question after any changes. A lot of this can be trial and error, and it’s very easy to break a function if you go in gung ho.
Elementor website hosting
Our slow WP Bakery site is hosted on an AMD Ryzen 7 Pro Ionos cloud server.
With 64GM of RAM and an 8 Core x 3.6 GHz CPU, it’s pretty powerful. Because of this high level of performance, we won’t need to switch servers as part of the speed improvements.
But if your site is on a shared hosting platform or an outdated server, it’s time for an upgrade. This is of particular importance if you operate a high traffic, feature-rich or eCommerce site.
Here are a few of the most important factors to consider when choosing a new server:
CPU performance
There are two factors to base your CPU decision making on:
- Number of cores
Look for a server with 8 or more cores. This should be your priority as a high number tends to equal better performance. - Clock speed
Aim for a frequency exceeding 3GHz. Even a multi-core processor with a slower frequency can outperform a single-core CPU.
There are two big CPU brands you should look out for – Intel and AMD. They both offer excellent quality, and the deciding factor will be your budget.
RAM
The more RAM, the quicker your server will perform. If it isn’t adequate, pages are much more likely to load slowly…or not at all.
Go for 16 or 32GB or RAM. This should be sufficient for moderately busy websites. You can always monitor the usage and increase it to 128GB or 256GB as needed.
Storage
There are two storage options – HDD and SDD:
- HDD
Hard Disk drives are the budget option. They offer a lot of space for your buck, but they are slow and get a bit delicate with age. - SSD
Solid-state drives are absolute speedsters in comparison, but that comes at a premium.
When making your selection, think about your future needs. If you foresee your site growing, go for the SDD. You want a scalable solution that’s going to meet your needs for some time, with the ability to upgrade the resources when the time comes.
Network performance
There are a trio of factors to be aware of regarding network performance:
- Bandwidth
Check the hosting provider’s bandwidth limits. They need to be able to handle your website’s total upstream and downstream traffic. - Physical location
Ensure the server data centre is geographically close to your primary customer base. If your customers are mainly in the UK but your website is hosted on a US server, the load time would be slower due to the latency. Essentially, the further the user is located from the server, the longer it will take for the website to load. - Uptime
Look for WordPress hosting providers with a high uptime guarantee. This will be a good indicator of their server and network infrastructure dependability.
Elementor final speed optimisation
To recap, we’ve implemented five points in our Elementor website speed strategy:
- Images are optimised with Imagify.
- The CDN has been created with Bunny.net.
- The WP Rocket caching plugin has been installed and setup.
- Previously site-wide plugins are only in specific locations thanks to Asset CleanUp Pro.
- The site is hosted on a powerful, geographically local Ionos cloud server.
It’s now time to put our optimisation to the test for a final time to see how the site is performing.
First, let’s do GTmetrix again.

That’s looking exceptionally good. We’re still scoring an “A” as before, but we’ve taken the Performance up (29% > 98% > 99%) and the Structure (79% > 92% > 97%) score even higher.

Our Google Page Speed insights are also looking good. We’ve pushed the Mobile performance score up again (29 > 61 > 73) and the Desktop score has improved (73 > 91 > 96) with every step of the Elementor optimisation work.
This strategy can be implemented on any slow WordPress website. Of course results will vary depending on factors such as your theme and plugins. But no matter if you’re using Elementor, WPBakery, or Gutenberg, this technique is virtually guaranteed to result in an ultra-fast site that the search engines and your users will love.


